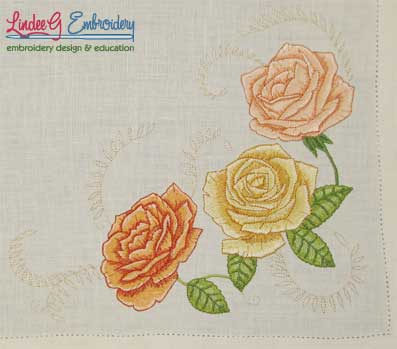
Realistic Roses Linen

Project Description
When I owned Cactus Punch, we created a lot of richly shaded and detailed realistic designs. These designs were beautiful but… they were high stitch count, high color count, and high distortion designs.
Now I lean toward lighter designs that sew up more quickly and perform better on a wider range of fabrics. This set of purchased artwork was designed for redwork, or outline, style stitching.
You may notice I have a high number of outline designs and it’s because I like them. While they aren’t all that quick to manually digitize, especially the more intricate ones, I like that the play well with other media. I like that they have more opportunity for creativity.
When I started digitizing these roses, I couldn’t resist also digitizing a more realistic version with shading and highlights. I’m generally not a big fan of outlines around fills and avoid them where I can. Here, though, they served a dual purpose by adding definition and providing a travel path for the shading color.
This sample was done for the title slide of my first Craftsy class, Thread Savvy, and combines both polyester and rayon embroidery threads with metallic. It was stitched on a purchased hem-stitched over-sized linen table napkin.
If you’re embroidery savvy, you may realize that the placement in the corner required a non-standard hooping technique. And, if you compare the designs used in this composition with those in the collection, you’ll see I’ve done some creative editing.
Once you get past the basics of mastering your embroidery machine and basic customizing, you’ll want to make your designs into something else and the best way to do that is with a stitch editor. One I recommend is Embrilliance Enthusiast.
For this project, I mostly cut off parts I didn’t want and rearranged the parts that were left. I did add a few stitches on some stems to get them to connect and you can add stitches manually in most stitch editors.
Since I was working in my digitizing software and had the original source file, I simply modified the stem object to add more stitches.
I used some of the outline versions for the background and stitched them in Softlight Metallic gold. Each rose and each leaf use three colors: medium for the base and then a light and a dark for the highlights and shading.
To reduce the color count, I carefully chose my colors so that I could use the same highlight color for all three flowers and I wouldn’t have to stop and rethread my 12-needle machine for an additional color.
Why use both poly and rayon in the same design? Strictly for color choices. I have a much wider color range in Madeira rayon but there were some colors I liked better in Hemingworth.
Some of the most creative embroiderers I know are masters at stitch editing and don’t even digitize!
Credits
Designed and made by Lindee Goodall (5/24/2014)

